Pages

Photobucket Photobucket Photobucket Photobucket Photobucket Photobucket

Sunday, July 31, 2011

Jar of Happiness for my Birthday

Tuesday is my thirty-something birthday and I wanted to make something fun for myself. A little happiness in a jar for my happy day please! These are great because I know that in no way during the week could I make a cake for myself. I can just put the lid on these beauties and store in the fridge until my day. (okay so we all ate one tonight but there is still 4 left...) 

I have seen these fun little cupcakes baked right in the jar over at Babble and had to give it a try myself.  {My birthday was the perfect excuse} It's an awesome tutorial but I wanted to make mine on a smaller scale and simplify the mess a little. 
I did make mine a little different and wanted to share with you all what worked for me.
1)Mix a white cake mix as directed. Separate into as many bowls as you want colors. (now that I think about it you could just mix the batter and food coloring up in the baggie and save a bowl mess)
2) Place each color of batter into individual gallon baggies. Cut a corner of the baggie off.
3)Using the baggie you just filled with caked batter, layer to fill each 1/2 pint jar halfway full of cake batter. If you fill it more than that, it will bake over and out of the jar.
4) Place on a baking sheet and bake at 325 for 45 or so minutes until your knife comes out clean.
5)Scoop the top of the cupcake off to make room for the icing.
 (it was a fun surprise to see how beautiful it was inside)

YUMMY!!! Happy Birthday to me!

linking up here

Saturday, July 30, 2011

Not So Funny Mustache Shirt


Today I wanted to make something simple, fun and quick. But not just any old thing.. something for my little guy better known as "Bubby".  I adore this image {Funny Mustache} in the Silhouette SD store! So when I spotted it again today, I knew it was perfect for him...or so I thought. I really thought he would think it was so funny. I was excited to debut it to him after nap and snap a few pics of him sporting it happily for the Glitter blog.. Little did I know he would be VERY unamused!! "No Mama, I want monster, dinosaur, truck!" Geesh.. I giggled at his case of after nap grumpies. Then, I roped the shirt on him to snap a pic of him looking halfway happy before it was inevitably wrestled off. Oh well...guess I can't win all the time.  I'll have to sneak the shirt on him some other time and maybe he will warm up to it? If not, I will just upcycle it into a shirt for my hubby..HA!

In case you want to make your own,
I used Silhouette black heat transfer material
and Silhouette image:
funny_spectacle_mustache_C00929_20387
7/20/2011


linking this up here

Friday, July 29, 2011

Glitter Friday Spotlight! 7-28

Happy Friday! 
Can you all believe it is Back-to-School season already?!
My daughter will be off to kindergarten in a couple of weeks. Bitter Sweet...
I picked up our school supply list and it is the size of Texas! I had no idea they needed so much!


Thank you all for joining the Glitter Link Party on Mondays and visiting my blog.


Here is this weeks Back-To-Scool Spotlight...
{Taidy Original} 

Butterfly Bookbag Tutorial


Featured On the Glitter Blog?
Running With Glitter

Thursday, July 28, 2011

Link Up: Happy Healthy Me!

What is the Happy Healthy Me Linky Project? It's a weekly link party sharing all things healthy and encourage one another to be healthy and happy. Click here to read more.

Last week you ladies shared so many amazing stories. 
I left each of your blogs feeling so inspired! Thank you!
Here is a few stories from last week...


This is Me                           In the Beginning               Happy, Healthy!              Fitness Plan for Anyone! 


This week I made a Grab and Go Snack Stash. It truly cut out all the unhealthy eating when I felt a snack attack coming on! Everything was prepared so it was so simple to just grab and go. I even grabbed the bags of fruit and veggies and tossed them in our lunch pack so I was not temped to eat out. I had to refill the stash in the fridge several times because my kids kept going back to it. I'm going to make one exclusively for my littles tomorrow. This was a win win for all of us in the family. 


Snack container veggies
via: Real Simple
What's in our Snack Attack Stash?
Natural Jiffy Peanut Butter
Yogurt
Cheese Sticks (Colby Jack and String)
Grapes
Blue Berries
Apples 
Baby Carrots
Sliced Cucumbers
Celery
Lunch Meat Roll Ups {wrap your lunch meat around a cheese stick}
Whole Wheat Crackers


Thank you everyone for sharing and joining the Happy Healthy Me Project!
Link up your recipes, stories, motivations and all things that encourage happy healthy living 
Get Your Healthy On!

Wednesday, July 27, 2011

Family Calendar Blackboard Tutorial-Guest Rook No.17

Today my friend from Jenn over at Rook No. 17 is joining us. She's just amazing in everything she does. Love her blog! Actually, were doing a blog swap so make sure to check out her blog today. 
Today she's showing us how to make a Family Calendar Blackboard.


Hello there Running With Glitter fans!  I'm Jenn, the crafter, baker, and glitter shaker behind the creative living blog Rook No. 17.  I'm a cake sculptor by profession and a mom 24/7; Rook No. 17 is a place where I share  my original recipes, vintage inspired crafts, and cake decorating tips and tutorials.


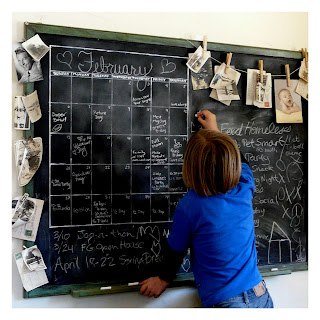
I'm as pleased as punch that Kelly has invited me to guest-post here today.  With another school year just around the corner, many families will be feeling the pressure to get organized.  This makes it a perfect time to create a family command center, where all the important schedules and details can be organized in one place.  With style and function in mind, I'm sharing with you, my tutorial for transforming an old classroom-style blackboard in to a Family Calendar organization center:

-----------------------------------------

It's not a new concept -- take something old, add blackboard paint...instant blackboard!  But it's a concept that I adore.  With a variety of blackboard paints available on the market, you can transform virtually any surface into a place to organize, to doodle, or sketch a blueprint of the plans for your empire!


A while back, I found a beat-up old chalkboard that had reached the end of the road at our local salvage yard.  I was looking for a way to keep my whole family in-the-know about our day-to-day plans, and also had some blank wall space in our living room that called for something vintage, personal, and meaningful.  That old chalkboard and I were just destined to find each other, I think!  

I painted and antiqued the frame and gave the blackboard two fresh coats of blackboard paint.  I sketched out a calendar using a yardstick and pencil, then went over the entire design with a white paint pen. This way, I don't have to draw a new calendar each month.  I simply chalk-in the name of the new month, add the numbers, and insert all the activities and appointments.  In the open space I'm able to post upcoming events and let the kids doodle away.  Every time we get a note from school about upcoming events, a birthday party invitation, or make some new plans, I just jot it down on the board.  


These large school-room style chalkboards seem to still be plentiful in second-hand stores, and can usually be picked up for a song.  If you're looking for a practical, yet decorative way to display your family's monthly schedule, here's how it can be done...


Family Calendar Blackboard Tutorial


Materials
1 large chalkboard/blackboard
Krylon Blackboard Paint
Blue Painters Tape
Newspaper
DecoArt Americana Black Acrylic Paint
DecoArt Antique Green
Sanding Pad, small grit
Fine tipped awl
Dark Brown Briwax
Painters brand Opaque Paint Marker, White, Medium Tip


Step 1:  Because my plans for the frame involved an underlying basecoat of black paint, I didn't have to bother with masking-off the frame while I sprayed the chalkboard with the Krylon Blackboard Paint.  (If you are painting your frame a light color, I recommend doing some masking to prevent overspray.)  I gave the blackboard one coat of paint, allowed it to dry, then gave it another coat.

Step 2:   Next, I masked off the freshly painted blackboard with newspaper and blue painters tape.

Step 3:  I coated the entire wood frame of the blackboard with black acrylic paint.  Once this was dry I followed-up with a coat of antique green acrylic paint.

Step 4:  I lightly sanded the frame at various points to mimic the look of age and wear.  I also used a fine tipped awl to produce the look of wormholes.

Step 4:  To complete the antiquing, I rubbed on two coats of dark brown Briwax.

Step 5:  After removing the newspaper and tape, I sketched out a calendar frame on the blackboard using a yardstick and pencil.  Once I achieved the desired design, I went over my sketch with a white paint marker.

Now I have a reusable calendar that keeps my family up-to-date, compliments my vintage home, and even provides some space to hang some of our old family photos.  

Monday, July 25, 2011

Glitter Link Party #19


This week I'm sharing.....

-AND-
(Please come back Thursday to join the Happy Healthy Me Link Party!
 You can see last weeks post here)
I can't wait to see What you all have been working on!

The Details:
  • Remember to "like" your favorite project
  • {I featured several "liked" projects last week over at the Glitter Facebook Page}
  • Link the specific post, not your main blog page.
  • It is not mandatory that you grab a button but please be a Running With Glitter follower. {I'm on Facebook too}
  • By linking up, you are giving me full permission to feature your post. {with a link back to your blog of course} 
  • You can link anything you want as long as you're not doing a direct sell. 
  • Please visit at least two linked projects and share some comment love. 
  • I will leave the Party open until Thursday at midnight.
Ready, Set, Link Away!


Photobucket

Running with Glitter


Sunday, July 24, 2011

Water Balloon flip flops


I thought It would be Fun for another Flip Flop Tutorial this week!
Remember my Scrappy Flip Flops Last Week?
 Summer is in full force, and it's time to head to the pool.
 Today I'm going to share with you how to up-do a plain pair of 
little girl flip flops and make them full of summer fun!
 Whats more fun than water balloons? Water balloons on your shoes!!
Here is how you can make these .....
  1. Supplies Needed: Water balloons and flip flops. I found both at Target. Total cost $3.50
  2. You need a total of 5 balloons per group. Stack 4 balloons on top of each other, ends facing opposite direction. 
  3. Time to attach these guys to your shoes. Take your 5th balloon {mine is the yellow balloon in the picture} and use it to tie your stack of 4 balloons to the flip flop. This can be a bit tricky, but after doing it a couple of times, you'll be a pro. If it becomes too tricky to tie with the balloon, you could always use a strong string or something similar.
  4. I tied 4 stacks of balloons to each side, a pinky finger tip width apart. So a total of 80 water balloons per shoe.  There you have it.  A super fun pair of flip flops that just screams summer!
Wait there is one more thing.. You need a matching hair bow to match your shoes, right?!
  1. Remove metal prong from center of clip. Stack your balloons together. 
  2. Tie the sets of balloons to your hair clip just like you did on your flip flops
  3. Re-insert the metal clip. Turn over and make adjustments to even out the balloons as necessary
  4. Tada! Done! Was that quick and easy or what!


Mom said don't run with scissors.... but she did not mention glitter!


Friday, July 22, 2011

Babalisme-Free Matryoshka Doll Party Printable

I have the honor of hosting Ning from Babalisme today. She is a super talented and super generous. Her free printable's are beautifully illustrated. I wish I had just an ounce of her talent. She is here today to share Part 5 of her Matryoshka Party kit. 
(it is exclusive to Running With Glitter YAY!)
Welcome Ning!

Hello Running with Glitters readers, babalismeIt's my first time guest blogging here, so I'd like to introduce myself. Am I sounding too formal by now? Oh, OK. Where was I? Right, I'm Ning (Babalisme blog). I'm a mother of one little girl and mostly I am either in front of the computer doing freelance design job (and blogging and procrastinating) or playing and                 napping with my 3 year old. I'm from Indonesia, where it rains all season. 


I'm here to share one of my Matryoshka Party Kit series, yes it's a free download printable, everyone, and today is the "Thank you Tags". Feel free to use these!

The direction is simple : download, print, cut. The tag is in Matryoshka shape and I think it's easy for even children to cut along, just be carfeul with the scissors. The tags can be use to thank someone (first doll from the left) and make sure you write something personal too, your children's school tag (middle doll) with their names and details, perfect for back to school season, and the last one is an all occasion tag, I simply made the matryoshka's belly blank so you can write anything there. You might also want to poke a little hole into the matryoshka's head if you want to hang it. 
Get the full kit!If you're setting up a matryoshka themed party don't forget to 

grab all previous party kits (HERE
We've got banners, straw label, cupcake topper, invitation 
and paper plates! Don't miss them out! 

Well now, before goodbye-ing, I'd like to thank Kelly for having me here and if you're all have had fun crafting/partying, please share with us some pics!

Thank you for Sharing today! I'm really excited to use these!
 Also you don't want to miss out on her other amazing paper printable's and crafts!

Thursday, July 21, 2011

Link up: Happy Healthy Me!

What is the Happy Healthy Me Linky Project?
Sorce:theultimatefemale.com
(a really cool blog too)
It is a weekly linky challenge to live a happier healthier life. A place where we can all share our stories, recipes and help support each other in our journey. I recently lost 95 pounds {you can read my story here} and have gained back almost 20. I fell back into old habits and need to make a forever lifestyle change. Together we can be an amazing support system for one another. Even if you don't have a single pound to lose, maybe you could share advice or a recipe. It is proven there is power in numbers!

I hope that you will share your stories and inspire one another. Please use Running With Glitter's link party as a gathering place and visit each other's blogs. Weekly, post something healthy on your own blog. Once the party really gets going we can start having monthly giveaways. YAY!

Your Weekly Challenge:
This week set goals and keep a food diary 
(if someone wants to make a Food Diary Printable 
I'll be happy to share it)


My Weekly Goals:
lose 1 1/2 pounds. My overall goal is to lose 20 pounds. 
Take a current Picture
Keep a food journal
Make a week menu plan for myself
Count Calories-goal of 1400
Use the elliptical while watching Big Brother
Have a dance party with my kids-twice!
{Weigh-in 149lbs yep, I gained a pound)


I thought Thursday would be a great day to start the party. I always need the motivation to stay focused thru the weekend. Next week I'll have a fun button to add for your collection :)
Let's get this party started!!!! Link up your stories, favorite fashions, pampering ideas, recipes and motivation!
{Come back Monday's for the crafty, DIY and recipe link party}

Wednesday, July 20, 2011

Guest- Henry Happend/ Herbal Soap tutorial

Today I'm super excited to have Stephanie here! Her blog is awesome! I love that I can get a dose of modern fashion and DIY! You have to check her out!

Hello Running with Glitter readers, this is Stephanie from henry happened. I am so excited to be here today! Thank you so much Kelly for having me!
If you have a bumper crop from an herb garden - I recommend making you very own soap! So easy and so fun to make. I picked up some plain, unscented glycerin soap and added herbs from the new garden and some citrus. I love the smell and bright green color of mint.
I diced up some rosemary to add with lemon zest.
I found some great napkins at Goodwill (where else) for 25 cents and some 50% off ribbon at Hobby Lobby for some easy gift wrapping.


I also thought about putting them on pretty antique plates found at Goodwill for $2. But does it look like I'm giving someone a slice of lemon cake? LOL
Herb and Citrus Soap
Recipe adapted from Martha

You'll need:
Glycerin soap (sold at craft stores)
Assorted herbs & citrus - I used basil, mint, rosemary, orange and lemon
Food processor
Glass bowl or measuring cup
Plastic spoon or scraper
Soaps molds - any plastic or cardboard container will do
Cooking spray

1. Melt soap
Put the soap blocks in glass bowl & melt in the microwave for 30 second intervals until melted. Stir every so often to break up big chunks.

2. Prepare additives
While melting, puree the herbs and squeeze out excess water in a paper towel. For citrus, zest the peel. You'll need about 1 tablespoon of additives for each cup.
FYI - Orange + basil = an unattractive muddy green brown color.
3. Get mould containers ready
You can buy cute moulds at the craft store, but any plastic container will work, even your Ziploc containers. Though you might want to use something you can just pitch in the recycle bin when finished rather than trying to clean. Use old milk cartons or even yogurt cups. Spray with cooking spray and wipe out excess.

4. Add purees
Once glycerin is melted, let it stand & cool for a few minutes. Before it sets too much, add the additives. Keep stirring to ensure they don't all float to the bottom. When you have the color you want (more time stirring = darker color) pour into container.
5. Setting the mould
Let the soap sit on the counter for about an hour to completely set. Then put in the freezer for another hour or so. Then it should pop right out. Slice with knife, give to someone you love and use within 3 months.
So there you have it - an easy, homemade gift! I'm a big of of easy projects, so stop by and say hi over henry happened. Thanks again Kelly!


Visit me @ Suzy's Artsy-Crafty Sitcom Today

I'm doing a fun interview today at Suzy's Artsy-Crafty Sitcom.
 Click here to visit her blog and learn more about me. 
Suzy's Artsy Craftsy Sitcom
I'm also Excited about her new Series. You don't want to miss it! 

Monday, July 18, 2011

Glitter Link Party #18

NOTE: The Glitter link party will now be held Monday-Thursday
This week I'm sharing.....
(Please come back Thursday to join the Happy Healthy Me Link Party!)


I can't wait to see What you all have been working on!

The Details:
  • Remember to "like" your favorite project
  • {I featured several "liked" projects last week over at the Glitter Facebook Page}
  • Link the specific post, not your main blog page.
  • It is not mandatory that you grab a button but please be a Running With Glitter follower. {I'm on Facebook too}
  • By linking up, you are giving me full permission to feature your post. {with a link back to your blog of course} 
  • You can link anything you want as long as you're not doing a direct sell. 
  • Please visit at least two linked projects and share some comment love. 
  • I will leave the Party open until Thursday at midnight.
Ready, Set, Link Away!


Photobucket

Running with Glitter


Related Posts Plugin for WordPress, Blogger...