Today my friend from Jenn over at Rook No. 17 is joining us. She's just amazing in everything she does. Love her blog! Actually, were doing a blog swap so make sure to check out her blog today.
Today she's showing us how to make a Family Calendar Blackboard.

-----------------------------------------
Today she's showing us how to make a Family Calendar Blackboard.

Hello there Running With Glitter fans! I'm Jenn, the crafter, baker, and glitter shaker behind the creative living blog Rook No. 17. I'm a cake sculptor by profession and a mom 24/7; Rook No. 17 is a place where I share my original recipes, vintage inspired crafts, and cake decorating tips and tutorials.
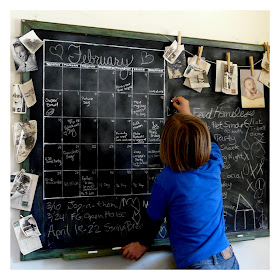
I'm as pleased as punch that Kelly has invited me to guest-post here today. With another school year just around the corner, many families will be feeling the pressure to get organized. This makes it a perfect time to create a family command center, where all the important schedules and details can be organized in one place. With style and function in mind, I'm sharing with you, my tutorial for transforming an old classroom-style blackboard in to a Family Calendar organization center:
-----------------------------------------
It's not a new concept -- take something old, add blackboard paint...instant blackboard! But it's a concept that I adore. With a variety of blackboard paints available on the market, you can transform virtually any surface into a place to organize, to doodle, or sketch a blueprint of the plans for your empire!
A while back, I found a beat-up old chalkboard that had reached the end of the road at our local salvage yard. I was looking for a way to keep my whole family in-the-know about our day-to-day plans, and also had some blank wall space in our living room that called for something vintage, personal, and meaningful. That old chalkboard and I were just destined to find each other, I think!
I painted and antiqued the frame and gave the blackboard two fresh coats of blackboard paint. I sketched out a calendar using a yardstick and pencil, then went over the entire design with a white paint pen. This way, I don't have to draw a new calendar each month. I simply chalk-in the name of the new month, add the numbers, and insert all the activities and appointments. In the open space I'm able to post upcoming events and let the kids doodle away. Every time we get a note from school about upcoming events, a birthday party invitation, or make some new plans, I just jot it down on the board.
These large school-room style chalkboards seem to still be plentiful in second-hand stores, and can usually be picked up for a song. If you're looking for a practical, yet decorative way to display your family's monthly schedule, here's how it can be done...
Family Calendar Blackboard Tutorial
Materials
1 large chalkboard/blackboard
Krylon Blackboard Paint
Blue Painters Tape
Newspaper
DecoArt Americana Black Acrylic PaintDecoArt Antique Green
Sanding Pad, small grit
Fine tipped awl
Dark Brown Briwax
Painters brand Opaque Paint Marker, White, Medium Tip
Step 1: Because my plans for the frame involved an underlying basecoat of black paint, I didn't have to bother with masking-off the frame while I sprayed the chalkboard with the Krylon Blackboard Paint. (If you are painting your frame a light color, I recommend doing some masking to prevent overspray.) I gave the blackboard one coat of paint, allowed it to dry, then gave it another coat.
Step 2: Next, I masked off the freshly painted blackboard with newspaper and blue painters tape.
Step 3: I coated the entire wood frame of the blackboard with black acrylic paint. Once this was dry I followed-up with a coat of antique green acrylic paint.
Step 4: I lightly sanded the frame at various points to mimic the look of age and wear. I also used a fine tipped awl to produce the look of wormholes.
Step 4: To complete the antiquing, I rubbed on two coats of dark brown Briwax.
Step 5: After removing the newspaper and tape, I sketched out a calendar frame on the blackboard using a yardstick and pencil. Once I achieved the desired design, I went over my sketch with a white paint marker.
Now I have a reusable calendar that keeps my family up-to-date, compliments my vintage home, and even provides some space to hang some of our old family photos.


