Pages

Photobucket Photobucket Photobucket Photobucket Photobucket Photobucket
Showing posts with label Gift Ideas. Show all posts

Tuesday, April 2, 2013

Personalized Tea/Coffee Mug Tutorial

 Today I'm going to share with you a super cute and easy gift idea.
Browsing Michaels armed with a 50% off coupon I found these blank photo mugs. They were $10.00 but my coupon made them $5.00. I have made a couple of trips this week :) The wheels began to turn... Then I spotted Amy Butler paper... SQUEAL!!!! Amy Butler is truly my favorite fabric designer and now this! Obviously this has been in the store a while because when I went to check out the Butler paper pack rang up $3.99! SHOCKING! I'm not a scrapbooker so I'm not familiar with paper.. But I'm familiar with the brand and know I got a smokin' deal. I right then decided that this paper was meant for this cup... Project problem solved. I came up with a Personalized Coffee/Tea mug. A couple of my girl friends have birthdays soon and they would drool over this paper... These mugs will make PERFECT gifts for them!  Here is how I made them........

First find a good quality travel mug. This one is a Michaels brand mug. It feels nice and heavy and seals up nice and tight. I'm sure you can find these at about any craft supply store.

Unscrew your cup and clean it. Then remove the fake family photo that was in the cup. Trace it on the back side of your paper. I use a pencil so I don't  have any pen marks on my paper.
Slip the paper you just cut out inside the cup and make sure it fits perfect.

This mug would be pretty if I just stopped right here! But decorate and personalize it I must.
I used my Silhouette SD to cut a frame and my name from the coordinating {yes, I bought one for myself too. I love it that much} papers. If you do not have a die cut machine you can always just cut out a shape with scalloped edged scissors and use letter stickers for the name. Have you seen the stickers at Hobby Lobby? SO many possibilities. It will be just as cute, I promise!
Glue your Frame and all your pieces to your main paper directly in the middle.
This is somewhat how your  paper should look like too. Easy peasy right? Roll your paper back up inside the cup, slip the cup back together and screw it together tight like Popeye the Sailorman and ENJOY! I'm making a few other little things to go along with the cups but I'm really excited about giving these away to my girls!


Saturday, June 25, 2011

Dove Story and a Wire Bird Nest Necklace

When my daughter Aubrey Rose was born in June 2006, a mama Dove made her nest on our back porch. Aubrey was born at 26 weeks and at that time we had no idea what was going to happen. We cherished every moment we had with her. When the first dove came, it was a symbol for us that things were going to be alright. The mama Dove was in a way a sign of peace and a reminder to trust in God. Five years later, that same dove comes back every spring and keeps reminding us how amazing life is.

It is June and the dove and her nest are near to my heart. So when Laura at live.laugh.photograph posted this Tutorial on how to make a bird nest I knew immediately I wanted to make one.

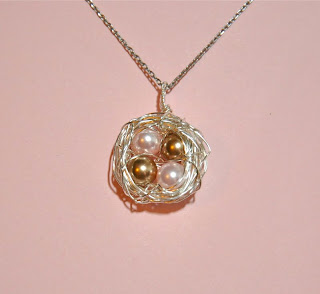
Here is how mine turned out. I love it! Just beautiful!
{I used 26 gage silver wire and Swarovski pearls from Hobby Lobby. 
The two Pink stones symbolize me and my daughter 
and the brown pearls my husband and son} 

Okay, who am I kidding...I made like a dozen......
I kept one and gifted the rest of them. Yeah, I'm a compulsive crafter but not a craft hoarder..lol
 It makes me so happy to give the things I made away! 
{You can add as many pearls as you want. 
I added 6 to the top left one for my friend with 6 kids}

I tried to photograph the necklace on but Aubrey put her hand over it...
 It made me love the picture even more... 
{If you haven't picked up I'm pretty emotional about my daughter.}


  Peace I leave with you; my peace I give you. 
I do not give to you as the world gives. 
Do not let your hearts be troubled and do not be afraid.
 John 14:27
{This is our Dove family 2011}
To learn how to make your own Wire Bird Nest please 
visit my dear friend Laura @ live.love.photograph here

To watch a Youtube video on how to make a 
different version with an attached loop to hang it with visit here

Sunday, June 12, 2011

Farmhouse Doll Bed for Aubrey Rose


I wish I could say that I made this bed but I would not be telling you the truth.
Ready? I have a confession... I, Kelly DeAnn, am afraid of power tools. *GASP I know* I took woodshop in high school and watched my boyfriend from back in the day CUT HIS THUMB OFF. I'll spare you the details. I am forever scared..

My daughter got Julie, an American Girl doll, for her birthday, and so of course Julie needed a bed. I recruited my handy dandy father-in-law to make it for me Aubrey. This bed is amazing, sturdy enough that the kids can sit on it, and way cute. It is for sure a family heirloom! My father-in-law said it was very simple, only took a couple of hours and cost him under $20 to make.

Okay, so I'm not a total slacker when it comes to making this bed because I did make the bedding!

Here is the 411 if you or a handy friend is up for a DIY....

AMAZING Farmhouse Doll Bed Tutorial HERE by Ana White.

Mattress Tutorial found here
**Note: her measurements are for a modified bed so you will need to make sure you take your own measurements before making the mattress from her tutorial. I learned the hard way and made it too small. My own fault for not reading directions better before I cut my fabric**


I just made the bedding using look alike quilt fabric and stitched in the fake ditch (seams) :) If anyone is interested in how I made the quilt, I will gladly do a tutorial. Just let me know.
We love everything about this bed. Thank you Papi!


{I'm linking up to these awesome blogs this week}

Sunday, June 5, 2011

Chapstick Tutorial, Templet & Free Pinkalicious Label


One of my daughter's favorite things is Chapstick. A collector of lip balm one may even call her. I decided that for her party it would be fun to make little personalized chapsticks for her and her friends.
There was several ways I could do this.
  • Martha Stewart has a great tutorial on making lip gloss here
  • I could order the supplies from CandleLynnSupplies on Etsy to do a little DIY
  • I could buy Chapstick and replace the labels
I decide to "sorta" make my own the #2 Etsy way.  Here's how:
  1. Gather Supplies-Lip Balm Base, tubes, and flavor
  2. Melt your base in the microwave. Checking and stirring every 30 seconds until it liquifies
  3. Add your flavor. I just guessed and added drops until I thought it tasted "right".  My daughter's choice of flavor was Monkey Farts and Cotton Candy. hmmmm...
  4. Fill your tubes. I used a small plastic bowl to keep the tubes from falling over. 
  5. Let harden. I popped mine in the Fridge for about an hour. 
Now for the Wrappers:
I have already been warned by Aubrey's 5 year old boy friend that he will not eat a pink cupcake so I decided to spare her the embarrassment and make a few boy labels too. lol

To make the wrappers I simply found images online and edited them in Picnik. Pinkalicious for the Girls and Monsters Inc. for the boys. In Picnik I cropped the images into a square, then added the oval sticker for their names in white and topped with my text. Easy Peasy. LOVING PICNIK! Then I saved the image to my desktop and dragged the image {copy and paste}to the word template, resized to fit in the template box and repeated as necessary. DONE! Again, Easy Peasy!

Here is the Pinkalicious chapstick label I made. You are more than welcome to use it. Just Click on the image then Right Click and save to your computer and add your own Text.


This was a  huge time saver! Blank MS Word Chapstick Template HERE

To attach my labels I used standard packing tape and plain printer paper.. I was pretty proud of myself for discovering this :) It worked out fabulously. I'm pretty sure I'm not the first person but hey...

Here is how to attach the labels:

  1. Gather Supplies- Packing Tape, Printed Paper, Scissors, blank filled chapstick tube
  2. Cut your labels out on the dotted lines and cover with packing tape. Trim the edges of tape that hang over the sides. Do not cut the tape off the ends. You will need this to secure the label to the tube.
  3. Wrap around the Chapstick and smooth the tape down. It will look seamless.
  4. Easy, Personal and cute!!!


HAPPY 
5th BIRTHDAY 
AUBREY ROSE!!!!!!
xoox

DIY Club
Related Posts Plugin for WordPress, Blogger...