Pages

Photobucket Photobucket Photobucket Photobucket Photobucket Photobucket
Showing posts with label Stuff I have Made. Show all posts

Tuesday, April 2, 2013

Personalized Tea/Coffee Mug Tutorial

 Today I'm going to share with you a super cute and easy gift idea.
Browsing Michaels armed with a 50% off coupon I found these blank photo mugs. They were $10.00 but my coupon made them $5.00. I have made a couple of trips this week :) The wheels began to turn... Then I spotted Amy Butler paper... SQUEAL!!!! Amy Butler is truly my favorite fabric designer and now this! Obviously this has been in the store a while because when I went to check out the Butler paper pack rang up $3.99! SHOCKING! I'm not a scrapbooker so I'm not familiar with paper.. But I'm familiar with the brand and know I got a smokin' deal. I right then decided that this paper was meant for this cup... Project problem solved. I came up with a Personalized Coffee/Tea mug. A couple of my girl friends have birthdays soon and they would drool over this paper... These mugs will make PERFECT gifts for them!  Here is how I made them........

First find a good quality travel mug. This one is a Michaels brand mug. It feels nice and heavy and seals up nice and tight. I'm sure you can find these at about any craft supply store.

Unscrew your cup and clean it. Then remove the fake family photo that was in the cup. Trace it on the back side of your paper. I use a pencil so I don't  have any pen marks on my paper.
Slip the paper you just cut out inside the cup and make sure it fits perfect.

This mug would be pretty if I just stopped right here! But decorate and personalize it I must.
I used my Silhouette SD to cut a frame and my name from the coordinating {yes, I bought one for myself too. I love it that much} papers. If you do not have a die cut machine you can always just cut out a shape with scalloped edged scissors and use letter stickers for the name. Have you seen the stickers at Hobby Lobby? SO many possibilities. It will be just as cute, I promise!
Glue your Frame and all your pieces to your main paper directly in the middle.
This is somewhat how your  paper should look like too. Easy peasy right? Roll your paper back up inside the cup, slip the cup back together and screw it together tight like Popeye the Sailorman and ENJOY! I'm making a few other little things to go along with the cups but I'm really excited about giving these away to my girls!


Thursday, December 20, 2012

Elf on the Shelf Christmas Eve Clue Scavenger Hunt

On Christmas Eve our Elf (Elfis) is going to fly back to the North Pole for his final report to Santa. When the kids tell him goodbye for the last time, our elf will have a special clue scavenger hunt game for them to play. At the end of the game there is a special gift that he has left behind for them. My husband will handwrite each of the clues on Official North Pole note cards and place them in envelopes. I will hide all the clues and then the fun begins.  
Elf on the Shelf Christmas Clue Eve Scavenger Hunt

Clue #1
Tonight I'm heading back to the North Pole. But before I go, a special present is yours to find. Jump up now! Move your behind! Yes it's the truth....You don’t have to go far. Just go to the place where we park our car.


Clue #2
Oh this game is so fun..Is it one of your wishes?....Just go look where Mom cleans the dirty dishes (this would be in sink)


Clue #3
Very good, moving right along....but to get the next clue you'll have to sing a fun Christmas song. How about a song about a reindeer? (after they sing hand them the next clue)

Clue #4
What a nice song....Run, run, run as fast as you can to the place where the laundry is done.


Clue #5
Now for a little rhyming fun...this clue will be harder...but it doesn't take a key or locks...I've hidden a clue in one of your _____ (socks) (this one I would plant the clue in a sock in their sock drawer...so they have to dig)


Clue #6
Wow you're doing great! It's in the place where you keep your shoes. Please put them on to get ready for the next clue.


Clue #7
Hurry up now...don't move like a snail...outside you'll find your next clue where they leave the _______ (mail)


Clue #8
Are you having fun? Maybe upstairs or maybe down, the next one can be seen in the place where you get clean.


Clue #9
Twas the night before Christmas....you've searched all through the house. I hope my game is not getting too old. Go look in the place where it's really cold (the freezer. I end it in the freezer so they don't see the gift as they are clue hunting) Before I go I have to say.. I'm reporting to Santa you are on the good list to stay! Merry Christmas!

Have fun!!!! I can't wait until Christmas Eve to play this with my kids!

Saturday, July 30, 2011

Not So Funny Mustache Shirt


Today I wanted to make something simple, fun and quick. But not just any old thing.. something for my little guy better known as "Bubby".  I adore this image {Funny Mustache} in the Silhouette SD store! So when I spotted it again today, I knew it was perfect for him...or so I thought. I really thought he would think it was so funny. I was excited to debut it to him after nap and snap a few pics of him sporting it happily for the Glitter blog.. Little did I know he would be VERY unamused!! "No Mama, I want monster, dinosaur, truck!" Geesh.. I giggled at his case of after nap grumpies. Then, I roped the shirt on him to snap a pic of him looking halfway happy before it was inevitably wrestled off. Oh well...guess I can't win all the time.  I'll have to sneak the shirt on him some other time and maybe he will warm up to it? If not, I will just upcycle it into a shirt for my hubby..HA!

In case you want to make your own,
I used Silhouette black heat transfer material
and Silhouette image:
funny_spectacle_mustache_C00929_20387
7/20/2011


linking this up here

Saturday, July 9, 2011

Adventures in My Blog Design

A few months ago I decided that the Glitter Blog needed its own look.. I seriously thought about it everyday trying to figure it out.  Obsessing possibly? I even bought a pre-made design on Etsy but it just wasn't exactly what I wanted.  The look of your blog is almost like your own face.. it is the very first impression that people get from you. I wanted something crisp and clean yet colorful and fun.

I played around and came up with a subway art design and loved it.. So I knew that I wanted to incorporate this into my blog.
Beyond this, I was not sure. I decided that I would start by making an inspiration board on Pinterest. From there, I found a picture of a ferris wheel with sparkles that I just loved and it became a starting point. 
{Art found here on Etsy}
I pinned and pinned some more. Finally, I discovered the colors that I loved so then I realized I wanted Running With Glitter to have a fun yummy candy feel. 
My inspiration board found here

YAY!  I was getting somewhere! When I was linking up my weekly DIY project. I looked at all the blog backgrounds that I had visited and found that my favorites were the ones that were just left white. 

I then searched Etsy for logos just to get more ideas. The ones I loved were in cute doodle frames so I searched doodle frame clip art and found one I really liked, which was commercially licensed. 

Next, I e-mailed that and all of my ideas and links to Cindy @ Blessed Design. She sent me a few samples and TADA! A blog design that is PERFECT for me. I know that she would have done a great job if I would have said surprise me...but honestly I'm just not a surprise me kind of girl. :) I like to think that my research really helped her too. One really good thing is that if I want to make a change or two she is just an e-mail away. 

In sharing this, my hope is that whether you are designing a blog or having one designed that maybe my adventures will help inspire you!


Saturday, June 25, 2011

Dove Story and a Wire Bird Nest Necklace

When my daughter Aubrey Rose was born in June 2006, a mama Dove made her nest on our back porch. Aubrey was born at 26 weeks and at that time we had no idea what was going to happen. We cherished every moment we had with her. When the first dove came, it was a symbol for us that things were going to be alright. The mama Dove was in a way a sign of peace and a reminder to trust in God. Five years later, that same dove comes back every spring and keeps reminding us how amazing life is.

It is June and the dove and her nest are near to my heart. So when Laura at live.laugh.photograph posted this Tutorial on how to make a bird nest I knew immediately I wanted to make one.

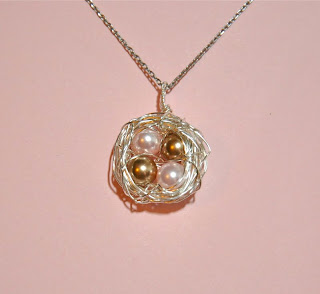
Here is how mine turned out. I love it! Just beautiful!
{I used 26 gage silver wire and Swarovski pearls from Hobby Lobby. 
The two Pink stones symbolize me and my daughter 
and the brown pearls my husband and son} 

Okay, who am I kidding...I made like a dozen......
I kept one and gifted the rest of them. Yeah, I'm a compulsive crafter but not a craft hoarder..lol
 It makes me so happy to give the things I made away! 
{You can add as many pearls as you want. 
I added 6 to the top left one for my friend with 6 kids}

I tried to photograph the necklace on but Aubrey put her hand over it...
 It made me love the picture even more... 
{If you haven't picked up I'm pretty emotional about my daughter.}


  Peace I leave with you; my peace I give you. 
I do not give to you as the world gives. 
Do not let your hearts be troubled and do not be afraid.
 John 14:27
{This is our Dove family 2011}
To learn how to make your own Wire Bird Nest please 
visit my dear friend Laura @ live.love.photograph here

To watch a Youtube video on how to make a 
different version with an attached loop to hang it with visit here

Sunday, May 29, 2011

Very Purple Person Reversible Bag

I'm learning........

The reason I started Running With Glitter is because I'm learning as I go and wanted to share my  adventures and misadventures with others. I'm not an expert, I have not been doing this my whole life just learning as I go. I learn most of the things I make from other bloggers. Blogland is full of inspiration and crazy talented people who share tutorials and are always helpful if I get stuck on a project. 

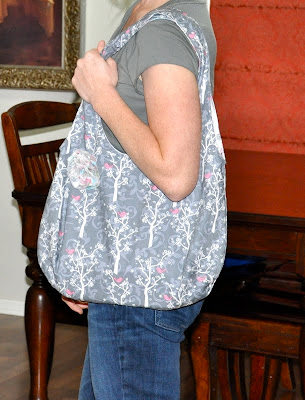
Which leads me into my next project. I bought a pattern a while back by McCalls. I cut it out, cut my fabric, started sewing and for the life of me I could not figure out how to finish the darn bag... The only thing I wanted to do was make a simple cute bag that I could throw in a few diapers, a few personal things, and go. I was on a mission to find a pattern I could understand. Not making a bag was not an option. Needless to say I ended up scrapping the McCalls pattern bag and found the PERFECT simple bag pattern at one of my favorite blogs Very Purple Person.  This is a great bag for sewing beginners and can be whipped up quickly. If your looking for instant gratification and simplicity you have to give the bag a try!

Very Purple Person Reversible Bag Pattern Here

{Fabric by Heidi Grace }

Sunday, March 13, 2011

Kokeshi Heat Transfer T-Shirts


I found theses cute images seen on the shirts on the Silhouette website. You can google Kokeshi Doll and find some really cute doll clip art to use.  I knew right away I must do something with them! They are just too cute to keep hidden on my computer, Loving the Kokeshi dolls!
I'm meeting one of my close friends  at our halfway point in Kansas City over spring break. She lives in Iowa and I live in Oklahoma. I decided to make a shirt for each of our girls. Perfect reason to buy the images and make a shirt :) Here is how I made them.....
Design your shirt. You can do them in MS word or any one of the many free photo editing programs. Make sure you mirror image your font before you print out. I did not mirror image the name the first time and ruined a shirt..lol live and learn. I can not count the number of projects I have scrapped because of little mistakes {Because I obviously can't follow package directions}.
You will need some type of printable iron-on transfer paper. You can find transfer paper almost at any craft store, Wal-Mart or Target. Just make sure you buy good quality heat transfer paper or your image will fade badly after the first wash.
Print your design out on heat transfer paper. Cut your image out leaving at least 1/4 inch border. If you cut it too close, your printed image color may will bleed out the side of your paper.
CUTE CUTE CUTE!!!! 
{How many times in one post can I say cute!?}
Center image on your shirt. I always fold my shirt in half to find the center and make a crease down the middle with my iron so I have the dead center marked.
Iron image on according to the packaged paper directions. 
Let shirt cool then slowly peel the paper backing off.  
{I'd say cute again but I think it may be getting a little annoying.} 

I added Rhinestones in the center of the flowers on the dolls just to give them a little sparkle. 
 And TA-DA! 
Simple, cheap and way cute!

{ I'm thinking of making little pillow dolls with the kokeshi doll clip art to give as a gift with the shirt too.....hmmmm}

Wednesday, March 2, 2011

St. Patrick's Day Shrinky Dink Shamrock Korker Tutorial


 Who would want to pinch my little cutie pie?! Well just in case... I thought I'd put together a super cute hair pretty for Aubrey Rose.
 Making korkers and Shrinky dinks in the same project makes me smile. I'm a nerd, I know.. But hey, here is a little tutorial so you can be a nerd with me.


To make the korkers you need:
1/4 inch Dowel Rods. You can find these pre-cut in a package of 12 at Hobby Lobby
Wooden clothes pins.
3/8 inch Grosgrain Ribbon
Liquid Starch
Oven
Fire

 Take your ribbon and pin it to the clothes pin to hold it in place. 
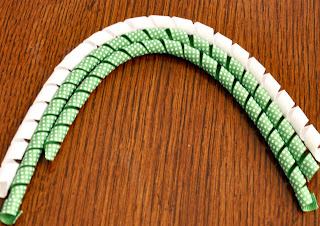
 Start Twisting making sure that your ribbon is not overlapping and you don't have any gaps.  After you do it a few times you will be a pro and it will go super fast!
 Secure your Ribbon at the end with the other clothes pin
 So simple, right?! Bake at 200-275* for 20-30 minutes depending on how your oven runs. 
Remove from oven. Spray lightly with starch and let cool. 

Remove from dowel rod and see how cute these are! 


Cut your ribbon in 3 inch strips.  I used my paper cutter to measure and help hold them in place while I cut ribbon
Heat seal the ends of the ribbon by moving fire quickly over the ends. This will prevent fraying. 
Take a thick piece of thread/yarn place under the center of your ribbons and gather all your pieces tightly together. This can be a bit tricky so again I used my paper cutter to help hold them in place. 
Wrap the string tightly around your bow a few more times and tie a knot. There you have it.. A korker bow!

 Now for the Shrinky Dink fun! 

 I found this great Shamrock clip art here.
 http://www.leehansen.com/clipart/Holidays/StPatrick/pages/shamrock-orange-edge.htm
I loved the orange outline Because it gave me a line to cut on :)
Resize to 50% larger of your desired size. Print on InkJet Shrinky Dink paper. Cut out the clip art from your Shrinky Dink paper and follow the Shrinky Dink package instructions for baking and making your shamrock.

When the shamrock was shrunk I added a little bit of glitter. I love when I make something that can be glittered! {Though you can skip the glitter all together}
Seal the glitter with clear finger nail polish

Hot glue your shamrock and secure it to the Top. 
 Slip an alligator clip on the bottom under the string. {I personally do not like to line my clips with ribbon because they don't stay in as well.}

 There you have it! This hair pretty ensures NO PINCHING next week on St. Patty's day!
{Please leave me a comment and let me know what you think}


{Here is where I LINKY PARTY}
Related Posts Plugin for WordPress, Blogger...